This article was sponsored by tenorshare
Many business owners include WhatsApp or WhatsApp Business as a tool to communicate with their costumers. The main reason is simple. This messaging app is very popular. It has more than 2 billion users around the globe (WhatsApp, 2019). We all know how important the customer’s data in business is. That’s why moving your WhatsApp or WhatsApp Business account to a new device can be stressful and worrisome. Foremost if your new phone has a different operating system and you are in the middle of deals with many customers. If you don’t have any ideas on how to a third-party tool to move WhatsApp contents to the new phone as it is faster and more effective.
Steps to export WhatsApp From Android To iPhone using email.
- Open WhatsApp ”Settings” on Android phone, and tap ”Chats” settings.
- Tap the ”Chat History” option
- Choose ”Export Chat”
- Choose Email or Gmail and enter your email address and send it
- On your iPhone, open inbox on your email and you will see all the WhatsApp chats you have sent. Unfortunately, the chats can only be seen in .txt format on your email and not really comfortable to read.
How To Transfer WhatsApp From Android To iPhone (The Easiest Way)
If you are not happy with the result of the first method, just use a third-party tool. Really. Tenorshare iCarefone WhatsApp Transfer is one of them. It is compatible with iOS 14/ iPadOS 14 and Android 10. You will get the chat history on your new phone exactly the same like on your old one as if you never switched the phone.
If you use WhatsApp Business, this tool can also help you to transfer all contents from one device to another without complicating yourself. iCareFone WhatsApp Transfer will help you exporting not only the chat history but also all information displayed on Business Profile and all products/ services listed on the Catalog, like magic.
1..Download and install iCareFone for WhatsApp Transfer on your computer and launch it once the installing process is done.


2. Connect your Android phone and the iPhone to the computer. iCareFone will automatically detect both devices. Make sure your Android phone is placed on the left side and iPhone on the right side, then click Transfer. On the popup window, choose Yes to confirm. 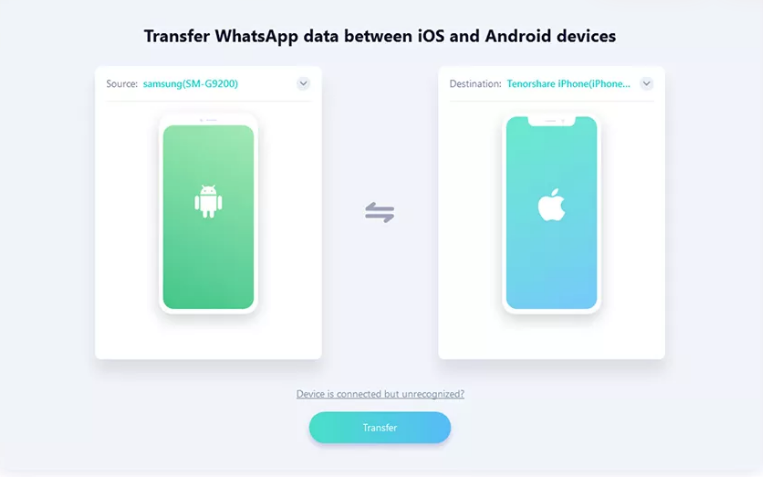
3. On the next window, select the Create new backup option and click Continue. Wait for the backup process to complete. 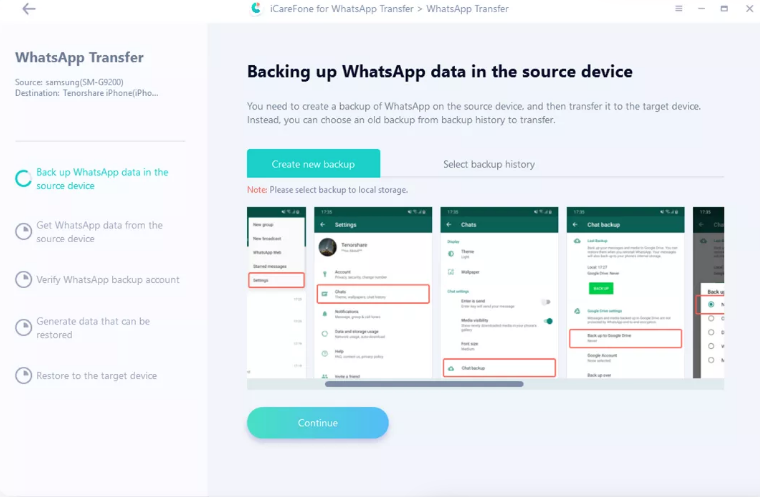
4. Next, you will be asked to verify the WhatsApp account that you use on Android phone. After filling your WhatsApp account info, hit the Verify key.
5. Check if you receive a WhatsApp verification code on your Android phone. Then, enter the code to the iCareFone app on your computer and click Verify. 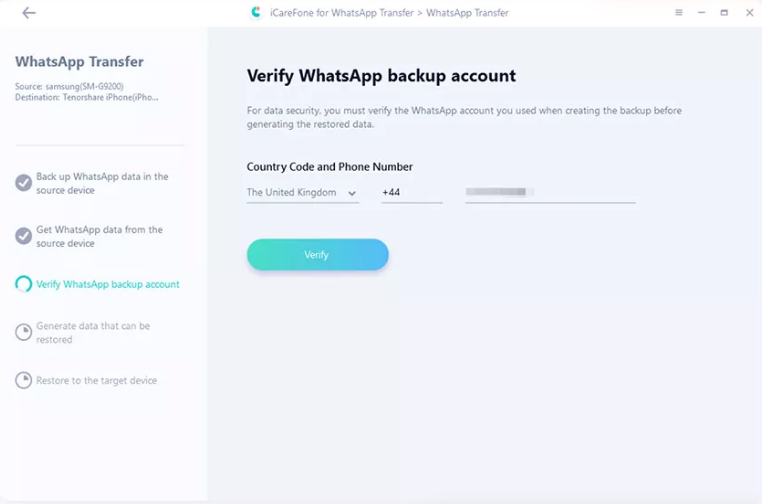
6. iCareFone will start generating data on your iPhone. It will take time depends on how much data you have on your WhatsApp account. Make sure you have logged into WhatsApp on your iPhone.
7. To successfully transfer WhatsApp from Android to iPhone, you will be asked to turn off Find My iPhone. Follow the on-screen instruction.
8. Once the restoring process is done, your iPhone will restart.